
Prerequisites #
- Raspberry Pi Pico W / WH
- Windows 11 PC
- USB cable
Install Python 3.9 #
As of now (2024), Python 3.9 is recommended.
Install Visual Studio Code #
Install Visual Studio Code Extensions #
Install the following extensions.
C/C++ (Publisher: Microsoft) #
CMake (Publisher: twxs) #
Raspberry Pi Pico (Publisher: Raspberry Pi) #
Python (Publisher: Microsoft) #
Install the Raspberry Pi Pico Driver #
Install Zadig on your PC #
Reset the Raspberry Pi Pico Board #
If another project has already been installed on it, the board must be reset.
If you hold down the white button on the board while connecting it to your PC with a USB cable, it will automatically mount as a USB mass storage device. [1]
Then, download the flash_nuke.uf2 file and place it in the board’s drive. The board will then automatically reset.
After resetting, disconnect the board from the PC and repeat operation [1].
Install the Driver #
Click Options, enable List All Devices, and select RP2 Boot (Interface 1).
Be sure to select Interface 1 instead of Interface 0. If you install it on Interface 0, the board’s connection function will definitely be broken.
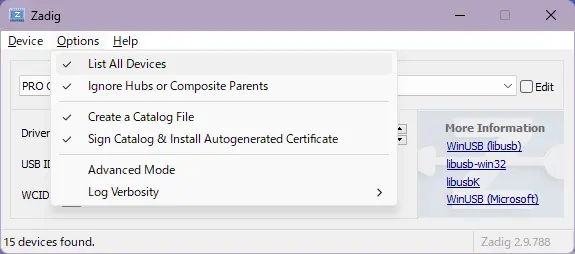
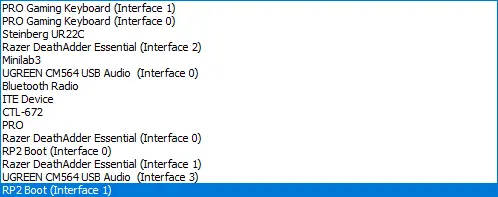
Then, select WinUSB and install it to the board.
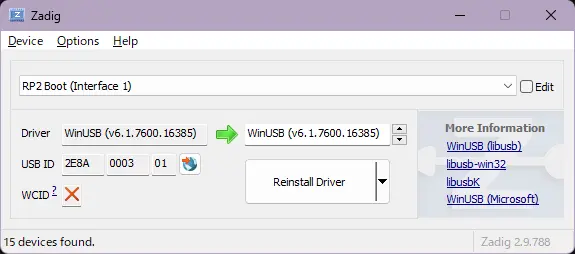
After installation, disconnect the board from the PC and repeat operation [1].
New Project #
Click on Raspberry Pi Pico Project in the Activity Bar on the left side of Visual Studio Code to open New C/C++ Project.
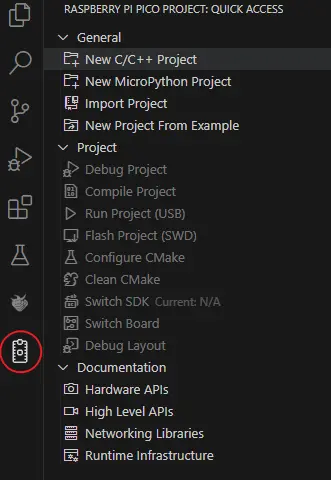
Select Pico W for Board type under Basic Settings.
Click the Example button to the left of Board type and select the project named blink.
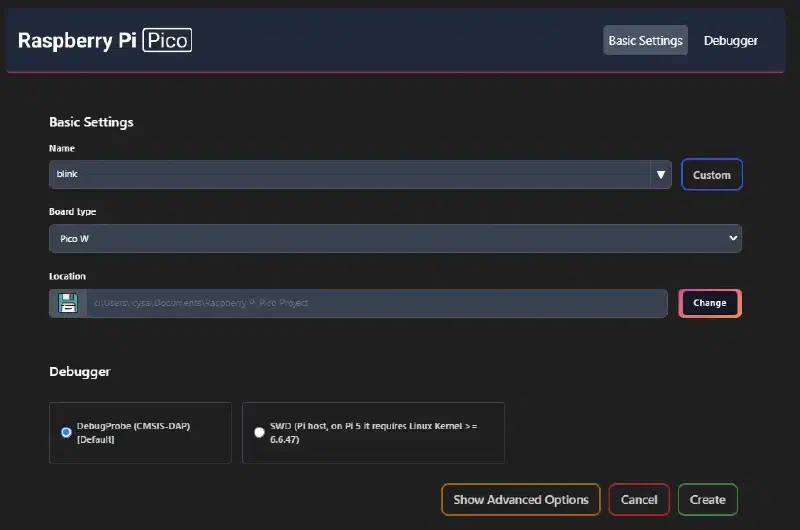
Then, click the Create button to create a new project.
If this is your first time, it will take a long time.
Changing the SDK Version (Unnecessary) #
Personally, I encountered unknown bugs when using SDK version 2.0, so I recommend changing it to SDK version 1.5.1.
Things went back to normal after I restarted my PC. It was probably my issue.
Open the project’s CMakeList.txt and change all instances of sdkVersion 2.0.0 and picotoolVersion 2.0.0 to sdkVersion 1.5.1 and picotoolVersion 1.5.1.
if(WIN32)
    set(USERHOME $ENV{USERPROFILE})
else()
    set(USERHOME $ENV{HOME})
endif()
set(sdkVersion 1.5.1)
set(toolchainVersion 13_2_Rel1)
set(picotoolVersion 1.5.1)
set(picoVscode ${USERHOME}/.pico-sdk/cmake/pico-vscode.cmake)
if (EXISTS ${picoVscode})
    include(${picoVscode})
endif()
If SDK Version 1.5.1 is not installed, create a new project and select v1.5.1 for the SDK version.
Compiling the Project #
Click the Compile button in the bottom right corner of Visual Studio Code to compile the project.
Running the Project #
There are two ways to run the project.
Method 1
Click the Run button in the bottom right corner of Visual Studio Code to run the project.
Method 2
Place the .uf2 file into the board’s storage. It will then run automatically.